 Thanksgiving is just around the corner and if you're looking for the PERFECT roll recipe look no further. You have found it. Give this recipe a whirl and enjoy!
My mom always makes these and they're a family favorite. Here's the recipe:
Thanksgiving is just around the corner and if you're looking for the PERFECT roll recipe look no further. You have found it. Give this recipe a whirl and enjoy!
My mom always makes these and they're a family favorite. Here's the recipe:Lion House Rolls Recipe -
2 Tablespoons yeast
1/2 cup warm water
1/2 cup sugar
1/2 cup butter softened (not melted)
1 1/2 cup warm milk (microwave for 1 minute)
2 eggs
1 teaspoon salt
5-6 cups flour
And here's how to make them:
Mix warm water and yeast and about a teaspoon of sugar together. Let the yeast rise for 10-15 minutes. The water should be warm, almost hot (but not too hot).
(Side note: don't be afraid of using yeast. For some reason I used to always be afraid I would kill it or it wouldn't grow. It's really very simple. I've had people tell me they've tried these rolls and they haven't turned out so I think you've got to get the yeast right first.)
It should look like this after 15 minutes.
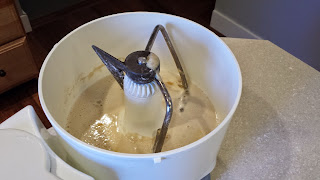
Transfer the yeast to your mixer. I use an old Bosch.
Heat 1 1/2 cups milk in the microwave for 1 minute. Add to the yeast in mixer.
Add the 1/2 cup of sugar.
Beat the 2 eggs in a separate bowl and then add them to the mixture.
Here's how it should look now.
Add your 1 teaspoon of salt.
Cut your 1/2 cup softened butter (1 stick) into chunks and add it to the mixer. Blend together. The butter won't mix in all the way until the flour is added.
Next, start adding your flour. The recipe calls for 5-6 cups. I usually end up using all 6. You just want to watch for the dough to pull away from the sides and not be too sticky but also not too stiff. I like to stay a bit on the sticky side so I can add more flour when I roll the dough out without it getting too dry.
My dough looked like this after adding all the flour.
Transfer the dough to another big bowl, cover with plastic wrap, and let rise until it doubles in size. This is how it'll look, I let mine grow until it touches the plastic wrap. Usually an 45-60 minutes.
After it has doubled in size, flour your countertop and dump the dough out. Knead a bit of flour in until it's not sticky and then split the dough into 4 equal sections.
Roll out one section at a time into a circle about 1/4" thick.
With a pizza cutter, slice the dough like a pizza into 8 triangles.
Roll them up into crescent shapes.
Transfer them to a greased baking sheet. Make sure you tuck the "tail" way under so it doesn't pop up when the rolls raise.
You should get exactly 32 rolls from one batch. I lay mine out on the cookie sheets like this.
Cover and let rise. I put them on my stovetop with the oven on so it's warm. It'll take an hour or an hour and a half. Oh, and if you don't have these awesome plastic covers for your pans you can get them at Orson Gygi. They are the best! You can cover the rolls with plastic wrap that has been sprayed with cooking spray if you don't have lids.
They should look like this after they have risen.
Bake them at 375 degrees for 10-12 minutes or until golden brown.
Butter the tops of the rolls right when they come out of the oven.
Put them in a basket and enjoy these beauties! Is there anything better than fresh homemade rolls right out of the oven?
Another great thing about making these rolls is that you'll most likely have leftovers to eat the next few days for breakfast. Just broil them in your oven for a few minutes, butter them, and serve them with Grandma's Hot Chocolate. You will be in heaven! It's probably my favorite way to eat these rolls!
I made a little video tutorial so hopefully it helps to see them made in action.
Leave a comment below if you have any questions about the recipe. They look pretty complicated from the long explanation but once you make them you'll see they're not so hard. Good luck!


Yummmmmmmmm!!
ReplyDelete